ドキュメント

Android デベロッパーアカウントの接続方法。

更新日 April 9, 2025

ステップ1:サービスアカウントを作成。

A. Google Cloud プロジェクト

  • Google Cloud コンソールページへ移動します。
  • 利用規約に同意します
  • プロジェクトを選択するか、新規プロジェクトを作成します

Google Cloud コンソールでプロジェクトを作成する手順です。

This image has an empty alt attribute; its file name is Google-Cloud-1024x640.pngThis image has an empty alt attribute; its file name is google-cloud-project-1024x640.pngThis image has an empty alt attribute; its file name is Google-cloud-new-project-1024x640.png

これでプロジェクトが作成されました。次はサービスアカウントを作成しましょう。

B. サービスアカウント

  • サイドバーを開きます。
  • 「IAM & Admin」をクリックします。
  • 「Service Accounts」をクリックします。

This image has an empty alt attribute; its file name is create-service-account-1024x640.png

  • + サービスアカウントを作成

This image has an empty alt attribute; its file name is create-service-account-1-1024x640.png

  • サービスアカウントの詳細

This image has an empty alt attribute; its file name is service-account-details-1024x640.png

  • サービスアカウントのロール

This image has an empty alt attribute; its file name is Service-account-role-1024x640.png

  • サービスアカウントにオーナーロールを付与します。

This image has an empty alt attribute; its file name is service-account-role-owner-1024x640.png

  • オーナーロール付きのサービスアカウントが作成されました。

This image has an empty alt attribute; its file name is service-account-created-1024x640.png

C. Evlopモバイルアプリ用の秘密鍵。

  • アクションメニューを開きます。
  • 「Manage Keys」をクリックします

This image has an empty alt attribute; its file name is manage-keys-1024x640.png

  • 「Add key」のドロップダウンをクリックします。
  • 「Create new key」をクリックします

This image has an empty alt attribute; its file name is create-new-key-1024x640.png

  • 「JSON」ファイル形式を選択します。
  • 「Create」をクリックします

This image has an empty alt attribute; its file name is private-key-JSON-1024x640.png

  • 秘密鍵がパソコンに保存されました。

This image has an empty alt attribute; its file name is private-key-saved-1024x640.png

ステップ2:Play Store APIを有効化する

サービスアカウントの作成が完了し、Evlopとの連携に必要な秘密鍵のダウンロードも済みました。次はPlay Store APIの有効化に進みましょう。

  • サービスアカウントのページに戻ります。

This image has an empty alt attribute; its file name is back-to-the-service-account-page-1024x640.png

  • 次の手順のためにサービスアカウントのメールIDをコピーしてください。

This image has an empty alt attribute; its file name is Copy-your-service-account-email-id-1024x640.png

  • ハンバーガーメニューをクリックしてください。
  • 「APIs & Services」をクリックしてください。
  • 「Enabled APIs & services」をクリックしてください。

This image has an empty alt attribute; its file name is Enabled-APIs-services-1024x640.png

  • 「+ENABLE APIs AND SERVICES」をクリックしてください。

This image has an empty alt attribute; its file name is ENABLE-APIS-AND-SERVICES-1024x640.png

  • 下にスクロールしてください。
  • 「Google Play Android Developer API」を探してクリックしてください。

This image has an empty alt attribute; its file name is play-android-api-1024x640.png

  • Google Play Android Developer APIを有効にする

This image has an empty alt attribute; its file name is enable-Google-Play-Android-Developer-API-1024x640.pngThis image has an empty alt attribute; its file name is Google-Play-Android-Developer-API-Enabled-1024x640.png

Google Play Android Developer APIが正常に有効化されました。

ステップ3: サービスアカウントのメールアドレスに管理者アクセスを許可する

  • Google Play Consoleにアクセスします。
  • サイドバーから「ユーザーと権限」ページを開きます。
  • 「新しいユーザーを招待」をクリックします

This image has an empty alt attribute; its file name is Users-and-permissions-1024x640.png

  • 以前コピーしたサービスアカウントのメールIDを貼り付けてください。
  • 「Account Permissions」をクリックします。
  • 「Admin (all permissions)」のチェックボックスをオンにします。
  • 「Invite User」をクリックします。

This image has an empty alt attribute; its file name is invite-new-user-1024x640.png

  • 招待を確認してください。

This image has an empty alt attribute; its file name is Confirm-the-invitation-1024x640.png

ステップ4:Android デベロッパーアカウントを接続

完了したら、Shopify ダッシュボードを開き、Evlop を Android デベロッパーアカウント と接続してください。

手順は以下の通りです:

  • Sales Channel セクションで Evlop をクリックします。
  • Account をクリックします。
  • Android developer account セクションのボックス内の Connect をクリックします。
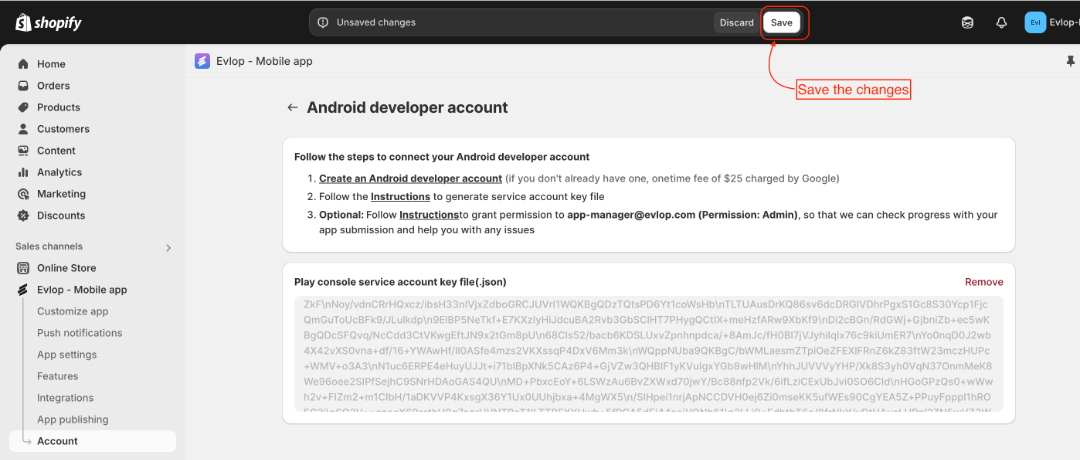
  • 次に、Private Key File をアップロードし、変更をSaveしてください。
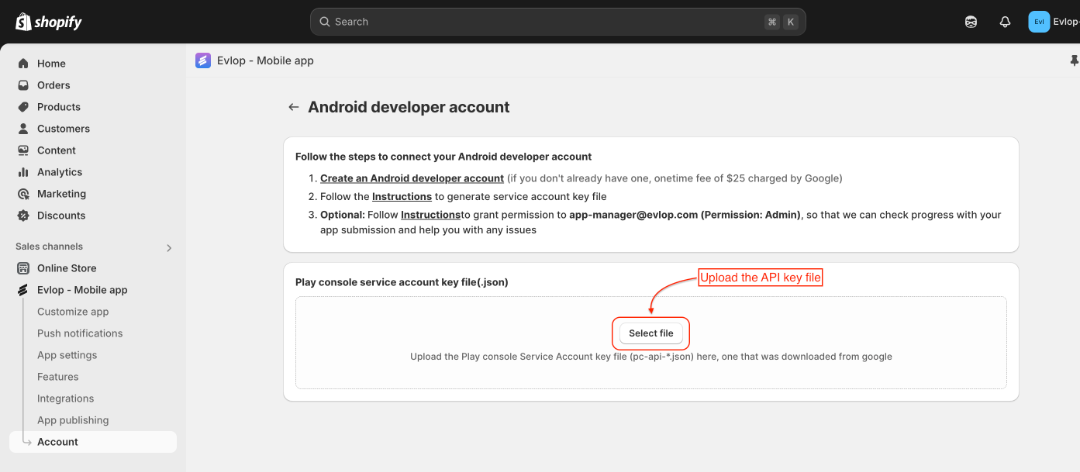
これでAndroid開発者アカウントとの連携が完了し、Androidアプリの公開プロセスに進む準備が整いました。