Schritt 1: Erstelle ein Servicekonto.
A. Google Cloud Projekt
- Gehe zu deiner Google Cloud Console.
- Stimme den Nutzungsbedingungen zu
- Wähle ein Projekt aus / erstelle ein neues Projekt
So erstellst du dein Projekt in der Google Cloud Console.


Dein Projekt ist damit erstellt. Lass uns nun ein Servicekonto anlegen.
B. Servicekonto
- Öffne die Seitenleiste.
- Klicke auf IAM & Admin
- Klicke auf Service Accounts.

- + Service‑Konto erstellen

- Details zum Service‑Konto

- Rolle des Service‑Kontos

- Gewähre dem Service‑Konto die Owner‑Rolle.

- Service‑Konto mit Owner‑Rolle erstellt.

C. Privater Schlüssel für deine Evlop Mobile‑App.
- Gehe zum Aktionsmenü.
- Klicke auf Schlüssel verwalten

- Klicke auf das Dropdown‑Menü „Schlüssel hinzufügen“.
- Klicke auf „Neuen Schlüssel erstellen“

- Wähle das Dateiformat „JSON“.
- Erstellen

- Der private Schlüssel wurde jetzt auf deinem Computer gespeichert.

Schritt 2: Play‑Store‑API aktivieren
Wir haben den Service‑Account erstellt und den privaten Schlüssel heruntergeladen, den wir jetzt mit Evlop verbinden müssen. Lass uns nun die Play‑Store‑API aktivieren.
- Gehe zurück zur Seite Service‑Accounts.

- Kopiere die Service-Account-E-Mail-ID für den nächsten Schritt.

- Klicke auf das Hamburger‑Menü
- Klicke ‘APIs & Services’
- Klicke ‘Enabled APIs & services’

- Klicke ‘+ENABLE APIS AND SERVICES’

- Scrolle nach unten.
- Finde und klicke ‘Google Play Android Developer API’

- Google Play Android Developer API aktivieren


Google Play Android Developer API wurde erfolgreich aktiviert.
Schritt 3: Admin‑Zugriff auf die Service‑Account‑E‑Mail.
- Gehe zu deiner Google Play Console.
- Öffne die Seite Benutzer und Berechtigungen in der Seitenleiste.
- Klicke auf „Neuen Benutzer einladen“

- Füge die zuvor kopierte Service Account Email ID ein.
- Klicke auf ‘Account Permissions’.
- Aktiviere das Kästchen ‘Admin (all permissions)’.
- Klicke auf ‘Invite User’

- Bestätige die Einladung

Schritt 4: Android Developer Account verbinden.
Öffne anschließend dein Shopify-Dashboard, um Evlop mit deinem Android Developer Account zu verbinden.
Befolge diese Schritte:
- Klicke im Bereich Sales Channel auf Evlop.
- Klicke auf Account.
- Klicke im Bereich Android developer account auf Connect.

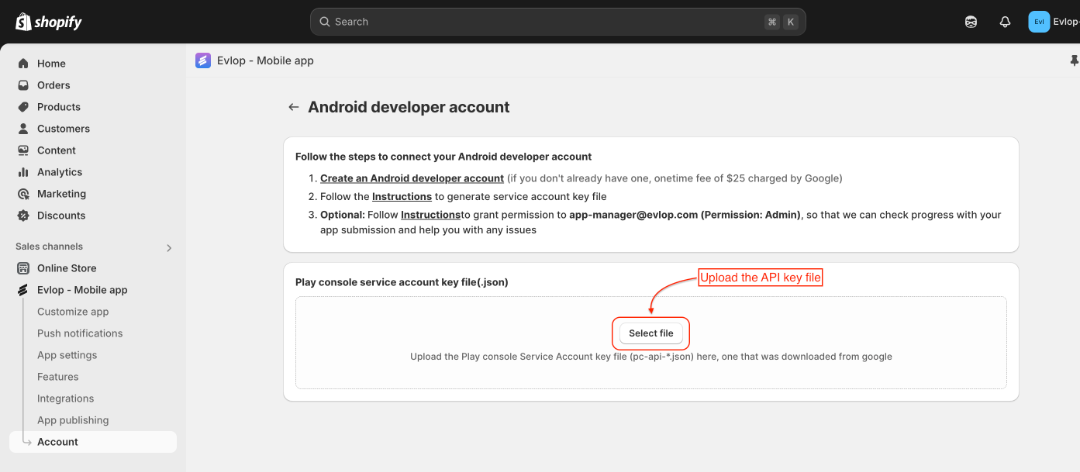
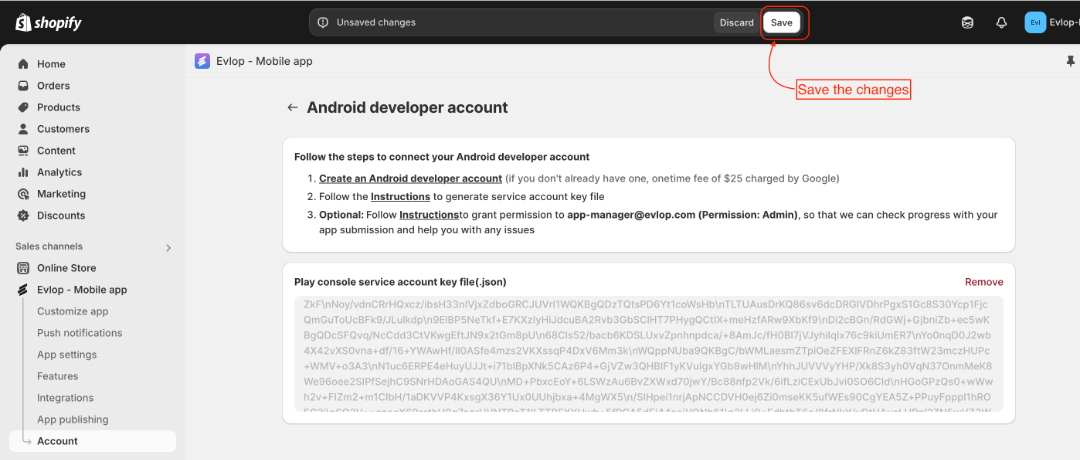
- Lade nun die Private Key File hoch und speichere die Änderungen.

Jetzt bist du erfolgreich mit dem Android-Entwicklerkonto verbunden und kannst mit dem Android App Publishing process fortfahren.