Docs

Android 개발자 계정을 연결하는 방법

업데이트됨 2025년 4월 9일

1단계: 서비스 계정을 생성하세요.

A. Google Cloud 프로젝트

  • Google Cloud Console 페이지로 이동하세요.
  • 서비스 약관에 동의하세요
  • 프로젝트를 선택하거나 새 프로젝트를 생성하세요

Google Cloud Console에서 프로젝트를 생성하는 방법입니다.

This image has an empty alt attribute; its file name is Google-Cloud-1024x640.pngThis image has an empty alt attribute; its file name is google-cloud-project-1024x640.pngThis image has an empty alt attribute; its file name is Google-cloud-new-project-1024x640.png

이렇게 프로젝트가 생성됩니다. 이제 서비스 계정을 생성해 보겠습니다.

B. 서비스 계정

  • 사이드바를 엽니다.
  • IAM & Admin을 클릭하세요
  • Service Accounts를 클릭하세요.

This image has an empty alt attribute; its file name is create-service-account-1024x640.png

  • + 서비스 계정 생성

This image has an empty alt attribute; its file name is create-service-account-1-1024x640.png

  • 서비스 계정 세부 정보

This image has an empty alt attribute; its file name is service-account-details-1024x640.png

  • 서비스 계정 역할

This image has an empty alt attribute; its file name is Service-account-role-1024x640.png

  • 서비스 계정에 소유자 역할을 부여합니다.

This image has an empty alt attribute; its file name is service-account-role-owner-1024x640.png

  • 소유자 역할이 부여된 서비스 계정이 생성되었습니다.

This image has an empty alt attribute; its file name is service-account-created-1024x640.png

C. Evlop 모바일 앱용 개인 키.

  • 작업(Action) 메뉴로 이동합니다.
  • Manage Keys를 클릭합니다.

This image has an empty alt attribute; its file name is manage-keys-1024x640.png

  • ‘Add key’ 드롭다운을 클릭합니다.
  • ‘Create new key’를 클릭합니다.

This image has an empty alt attribute; its file name is create-new-key-1024x640.png

  • ‘JSON’ 파일 형식을 선택합니다.
  • Create를 클릭합니다.

This image has an empty alt attribute; its file name is private-key-JSON-1024x640.png

  • 이제 프라이빗 키가 컴퓨터에 저장되었습니다.

This image has an empty alt attribute; its file name is private-key-saved-1024x640.png

2단계: Play Store API 활성화

서비스 계정 생성 단계를 완료했고 Evlop과 연결하는 데 필요한 프라이빗 키도 다운로드했습니다. 이제 Play Store API를 활성화하는 단계로 넘어가겠습니다.

  • 서비스 계정 페이지로 돌아갑니다.

This image has an empty alt attribute; its file name is back-to-the-service-account-page-1024x640.png

  • 다음 단계에서 사용할 서비스 계정 이메일 ID를 복사하세요.

This image has an empty alt attribute; its file name is Copy-your-service-account-email-id-1024x640.png

  • 햄버거 메뉴를 클릭하세요
  • ‘APIs & Services’를 클릭하세요
  • ‘Enabled APIs & services’를 클릭하세요

This image has an empty alt attribute; its file name is Enabled-APIs-services-1024x640.png

  • ‘+ENABLE APIS AND SERVICES’를 클릭하세요

This image has an empty alt attribute; its file name is ENABLE-APIS-AND-SERVICES-1024x640.png

  • 아래로 스크롤하세요.
  • ‘Google Play Android Developer API’를 찾아 클릭하세요

This image has an empty alt attribute; its file name is play-android-api-1024x640.png

  • Google Play Android Developer API 사용

This image has an empty alt attribute; its file name is enable-Google-Play-Android-Developer-API-1024x640.pngThis image has an empty alt attribute; its file name is Google-Play-Android-Developer-API-Enabled-1024x640.png

Google Play Android Developer API가 성공적으로 활성화되었습니다.

Step 3: Admin Access to the Service Account Email.

  • Google Play Console으로 이동합니다.
  • 사이드바에서 사용자 및 권한 페이지로 이동합니다.
  • ‘새 사용자 초대’를 클릭합니다.

This image has an empty alt attribute; its file name is Users-and-permissions-1024x640.png

  • 복사해 둔 서비스 계정 이메일 ID를 붙여넣으세요.
  • ‘Account Permissions’를 클릭하세요.
  • ‘Admin (all permissions)’ 체크박스를 선택하세요.
  • ‘Invite User’를 클릭하세요.

This image has an empty alt attribute; its file name is invite-new-user-1024x640.png

  • 초대를 확인하세요.

This image has an empty alt attribute; its file name is Confirm-the-invitation-1024x640.png

Step 4: Connect Android Developer Account.

완료되면 Shopify 대시보드에서 Evlop을 Android Developer Account와 연결하세요.

다음 절차를 따르세요:

  • Sales Channel 섹션에서 Evlop을 클릭하세요.
  • Account을 클릭하세요.
  • Android developer account 섹션의 박스 안에 있는 Connect를 클릭하세요.
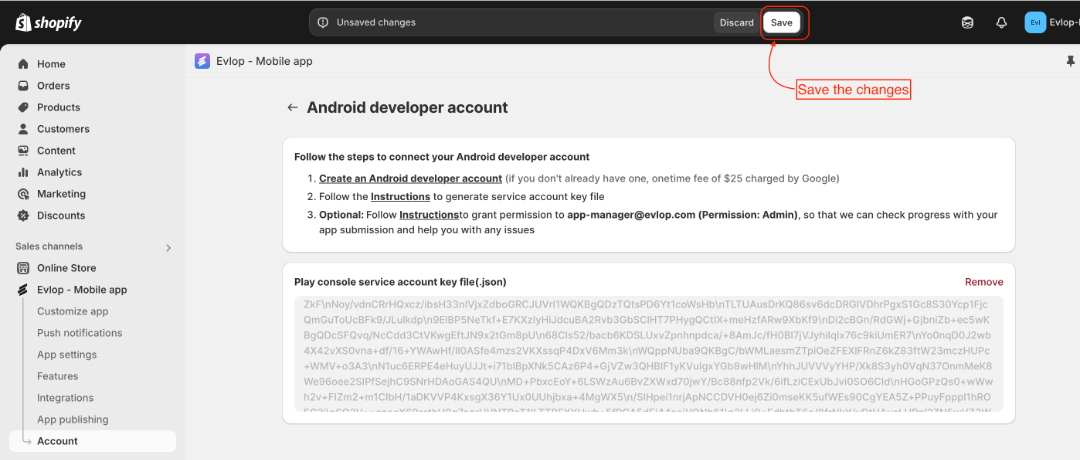
  • 이제 Private Key File을 업로드하고 Save를 눌러 변경사항을 저장하세요.
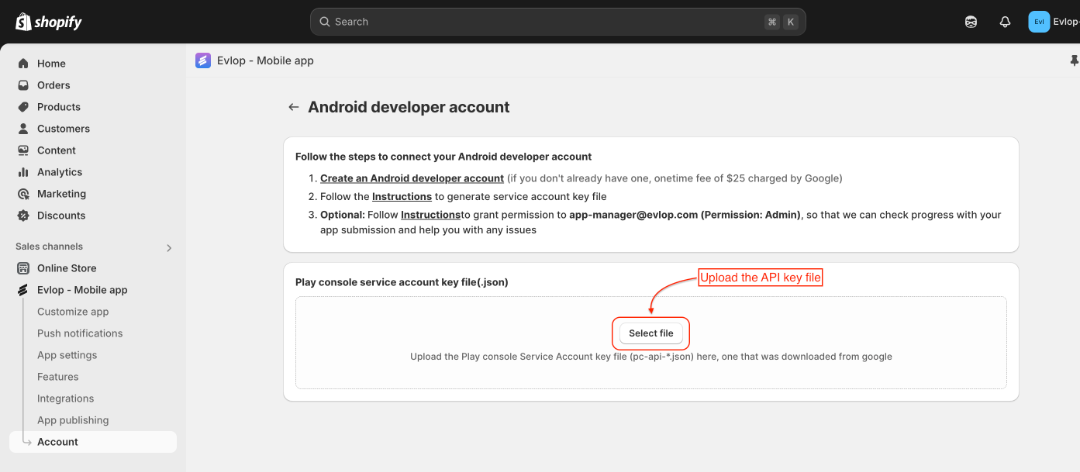
이제 Android 개발자 계정 연결이 완료되었으며, Android 앱 배포 절차를 진행할 준비가 되었습니다.