Docs

איך לחבר חשבון מפתח Android.

Updated 9 באפריל 2025

שלב 1: יצירת חשבון שירות.

א. פרויקט ב-Google Cloud

  • עברו לדף Google Cloud Console שלכם.
  • אשרו את תנאי השימוש
  • בחרו פרויקט קיים או צרו פרויקט חדש

כך תוכלו ליצור את הפרויקט שלכם ב-Google Cloud Console.

This image has an empty alt attribute; its file name is Google-Cloud-1024x640.pngThis image has an empty alt attribute; its file name is google-cloud-project-1024x640.pngThis image has an empty alt attribute; its file name is Google-cloud-new-project-1024x640.png

הפרויקט שלכם ייווצר בעקבות זאת. נמשיך ליצירת חשבון שירות.

ב. חשבון שירות

  • פתחו את סרגל הצד.
  • לחצו על IAM & Admin
  • לחצו על Service Accounts.

This image has an empty alt attribute; its file name is create-service-account-1024x640.png

  • + צרו חשבון שירות

This image has an empty alt attribute; its file name is create-service-account-1-1024x640.png

  • פרטי חשבון השירות

This image has an empty alt attribute; its file name is service-account-details-1024x640.png

  • תפקיד חשבון השירות

This image has an empty alt attribute; its file name is Service-account-role-1024x640.png

  • העניקו לחשבון השירות תפקיד בעלים.

This image has an empty alt attribute; its file name is service-account-role-owner-1024x640.png

  • חשבון שירות נוצר עם תפקיד בעלים.

This image has an empty alt attribute; its file name is service-account-created-1024x640.png

C. מפתח פרטי לאפליקציית המובייל שלכם ב‑Evlop.

  • עברו לתפריט Action.
  • לחצו על Manage Keys

This image has an empty alt attribute; its file name is manage-keys-1024x640.png

  • לחצו על התפריט הנפתח ‘Add key’.
  • לחצו על ‘Create new key’

This image has an empty alt attribute; its file name is create-new-key-1024x640.png

  • בחרו בפורמט קובץ ‘JSON’.
  • לחצו על Create

This image has an empty alt attribute; its file name is private-key-JSON-1024x640.png

  • המפתח הפרטי נשמר כעת במחשב שלכם.

This image has an empty alt attribute; its file name is private-key-saved-1024x640.png

שלב 2: הפעלת Play Store API

סיימנו את שלב יצירת חשבון השירות וגם הורדנו את המפתח הפרטי שדרוש לנו להתחברות ל-Evlop. עכשיו נמשיך להפעלת Play Store API.

  • חזרו לעמוד Service Accounts.

This image has an empty alt attribute; its file name is back-to-the-service-account-page-1024x640.png

  • העתיקו את כתובת האימייל של חשבון השירות לשלב הבא.

This image has an empty alt attribute; its file name is Copy-your-service-account-email-id-1024x640.png

  • לחצו על תפריט ההמבורגר
  • לחצו על ‘APIs & Services’
  • לחצו על ‘Enabled APIs & services’

This image has an empty alt attribute; its file name is Enabled-APIs-services-1024x640.png

  • לחצו על ‘+ENABLE APIS AND SERVICES’

This image has an empty alt attribute; its file name is ENABLE-APIS-AND-SERVICES-1024x640.png

  • גללו מטה.
  • אתרו ולחצו על ‘Google Play Android Developer API’

תמונה זו היא עם אטריביוט alt ריק; שם הקובץ שלה הוא play-android-api-1024x640.png

  • אפשרו את Google Play Android Developer API

תמונה זו היא עם אטריביוט alt ריק; שם הקובץ שלה הוא enable-Google-Play-Android-Developer-API-1024x640.pngתמונה זו היא עם אטריביוט alt ריק; שם הקובץ שלה הוא Google-Play-Android-Developer-API-Enabled-1024x640.png

Google Play Android Developer API הופעל בהצלחה.

שלב 3: גישה לחשבון השירות מהדואר האלקטרוני.

  • לכו ל Google Play Console שלכם.
  • לכו לדף משתמשים והרשאות מהתפריט.
  • לחצו על ‘הזמינו משתמש חדש’

תמונה זו היא עם אטריביוט alt ריק; שם הקובץ שלה הוא Users-and-permissions-1024x640.png

  • הדביקו את מזהה האימייל של חשבון השירות שהעתקתם קודם.
  • לחצו על ‘Account Permissions’.
  • סמנו את התיבה ‘Admin (all permissions)’.
  • לחצו על ‘Invite User’

This image has an empty alt attribute; its file name is invite-new-user-1024x640.png

  • אשרו את ההזמנה

This image has an empty alt attribute; its file name is Confirm-the-invitation-1024x640.png

שלב 4: חיבור חשבון מפתח Android.

לאחר מכן עליכם לפתוח את לוח הבקרה של Shopify כדי לחבר את Evlop עם חשבון המפתח Android שלכם.

עקבו אחרי השלבים:

  • לחצו על Evlop תחת סעיף Sales Channel section.
  • לחצו על Account.
  • לחצו על Connect בתוך התיבה של סעיף Android developer account section.
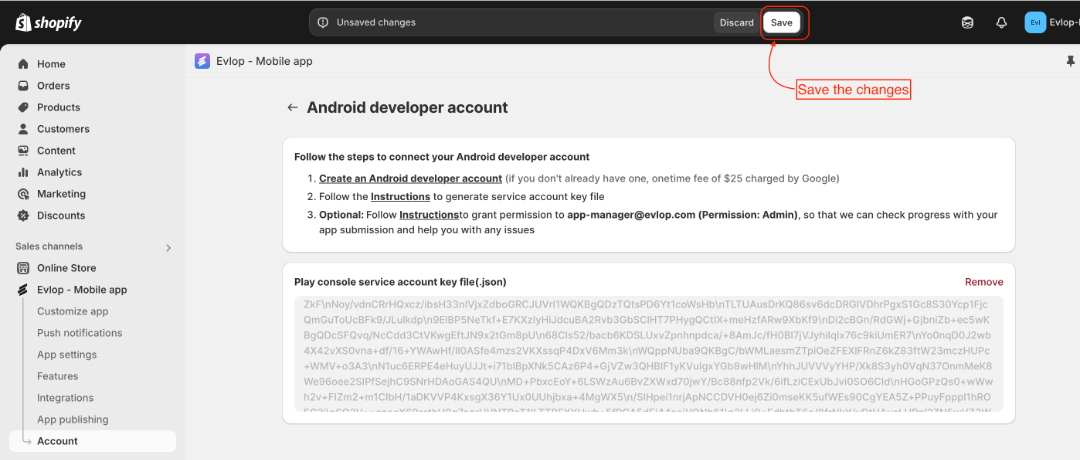
  • כעת העלו את Private Key File ולחצו על Save the changes.
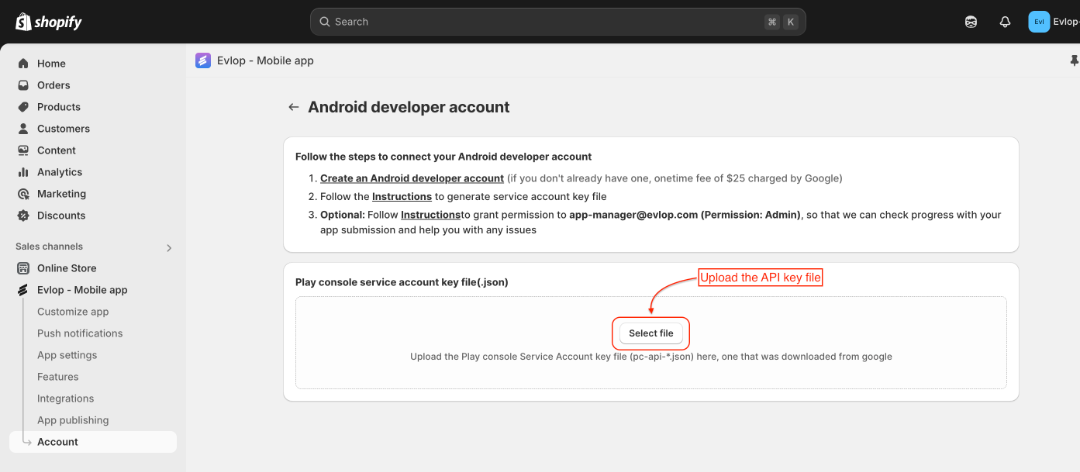
כעת אתם מחוברים בהצלחה לחשבון המפתחים של Android ומוכנים להמשיך בתהליך פרסום אפליקציית Android.