Paso 1: Crea una cuenta de servicio.
A. Proyecto de Google Cloud
- Ve a la página de tu Google Cloud Console.
- Acepta los Términos del Servicio
- Selecciona un proyecto / crea un proyecto nuevo
Así es como puedes crear tu proyecto en Google Cloud Console.


Tu proyecto se habrá creado con esto. Vamos a crear una cuenta de servicio.
B. Cuenta de servicio
- Abre la barra lateral.
- Haz clic en IAM & Admin
- Haz clic en Cuentas de servicio.

- + Crear cuenta de servicio

- Detalles de la cuenta de servicio

- Rol de la cuenta de servicio

- Otorga a la cuenta de servicio un rol de Propietario.

- Cuenta de servicio creada con un rol de Propietario.

C. Clave privada para tu app móvil de Evlop.
- Ve al menú Acción.
- Haz clic en Administrar claves

- Haz clic en el desplegable ‘Add key’.
- Haz clic en ‘Create new key’

- Selecciona el formato de archivo ‘JSON’.
- Crear

- La clave privada ahora está guardada en tu ordenador.

Paso 2: Habilitar API de Play Store
Hemos completado el paso de crear la cuenta de servicio y también descargado la clave privada que necesitamos para conectar con Evlop; ahora continuemos para habilitar la API de Play Store.
- Regresa a la página de Cuentas de servicio.

- Copia el ID del correo electrónico de la cuenta de servicio para el siguiente paso.

- Haz clic en el menú de hamburguesa
- Haz clic en ‘APIs & Services’
- Haz clic en ‘Enabled APIs & services’

- Haz clic en ‘+ENABLE APIS AND SERVICES’

- Desplázate hacia abajo.
- Localiza y haz clic en ‘Google Play Android Developer API’

- Habilita la Google Play Android Developer API


La Google Play Android Developer API se ha habilitado correctamente.
Paso 3: Acceso de administrador al correo electrónico de la cuenta de servicio.
- Ve a tu Google Play Console.
- Ve a la página Usuarios y permisos en la barra lateral.
- Haz clic en «Invite New User»

- Pega el ID de correo de la cuenta de servicio que copiaste antes.
- Haz clic en ‘Account Permissions’.
- Marca la casilla ‘Admin (all permissions)’.
- Haz clic en ‘Invite User’

- Confirma la invitación

Paso 4: Conecta tu cuenta de desarrollador de Android.
Una vez hecho esto, abre tu panel de Shopify para conectar Evlop con tu cuenta de desarrollador de Android.
Sigue estos pasos:
- Haz clic en Evlop en la sección Sales Channel.
- Haz clic en Account.
- Haz clic en Connect dentro del recuadro de la sección de la cuenta de desarrollador de Android.

- Ahora, sube el archivo de clave privada y guarda los cambios.
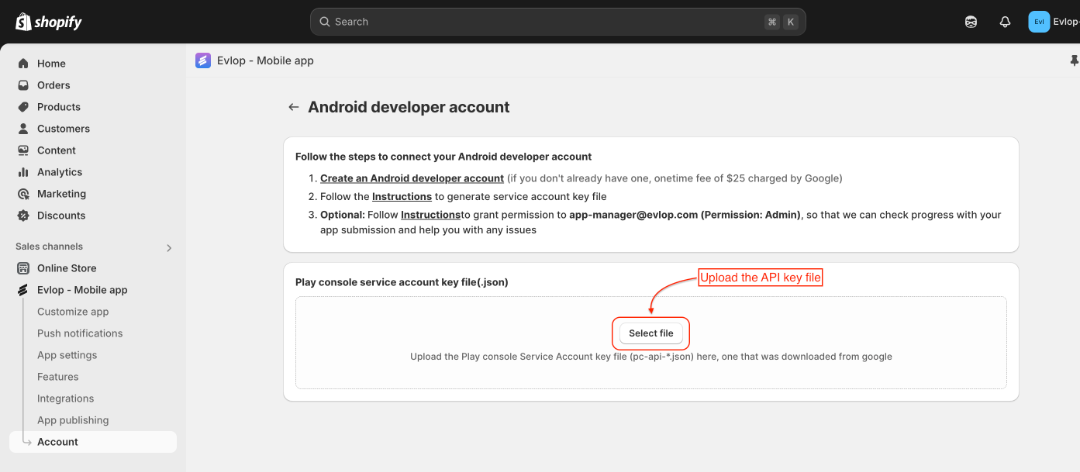
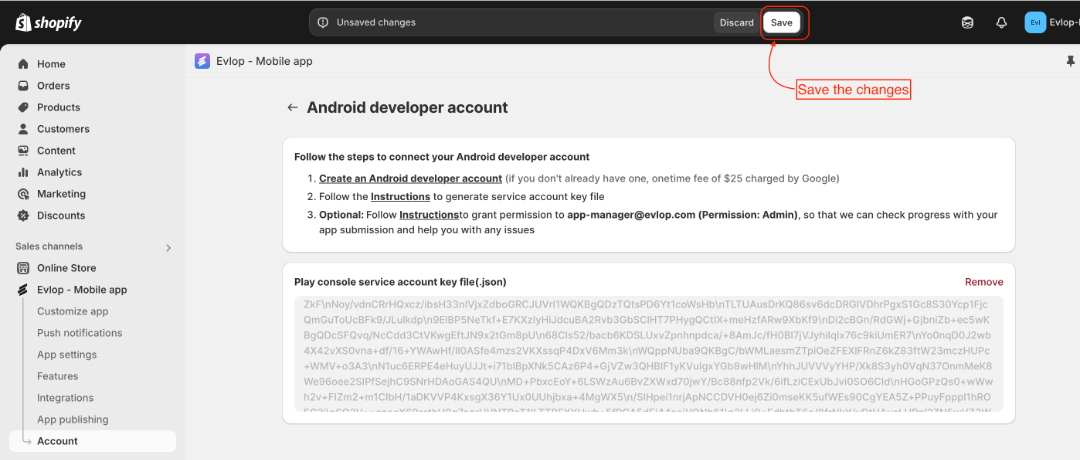

Ahora ya estás conectado correctamente a la cuenta de desarrollador de Android y listo para continuar con el proceso de publicación de la app Android.