第 1 步:创建服务账号。
A. Google Cloud 项目
- 前往您的 Google Cloud Console 页面。
- 同意服务条款
- 选择一个项目/创建新项目
这就是您在 Google Cloud Console 上创建项目的方法。


这样项目就创建好了,接下来我们继续创建服务账号。
B. 服务账号
- 打开侧边栏。
- 点击 IAM & Admin
- 点击 Service Accounts。

- + 创建服务账号

- 服务账号详情

- 服务账号角色

- 为服务账号授予 Owner(所有者)角色。

- 已创建拥有 Owner(所有者)角色的服务账号。

C. 您的 Evlop 移动应用的私钥。
- 前往 Action 菜单。
- 点击 Manage Keys

- 点击 “Add key” 下拉菜单。
- 点击 “Create new key”

- 选择 “JSON” 文件格式。
- 创建

- 私钥已保存到您的电脑。

步骤 2:启用 Play Store API
我们已完成创建服务账户的步骤,并下载了用于与 Evlop 连接的私钥,接下来继续启用 Play Store API。
- 返回 Service Accounts 页面。

- 复制服务账号的电子邮件 ID,以便进行下一步。

- 点击汉堡菜单
- 点击‘APIs & Services’
- 点击‘Enabled APIs & services’

- 点击‘+ENABLE APIS AND SERVICES’

- 向下滚动。
- 定位并点击‘Google Play Android Developer API’

- 启用 Google Play Android 开发者 API


Google Play Android 开发者 API 已成功启用。
步骤 3:管理员访问服务账户邮箱。
- 前往您的 Google Play 控制台。
- 从侧边栏进入“用户和权限”页面。
- 点击‘Invite New User’

- 粘贴您之前复制的服务账号电子邮件 ID。
- 点击“Account Permissions”。
- 勾选“Admin (all permissions)”复选框。
- 点击“Invite User”。

- 确认邀请

步骤 4:连接 Android 开发者账户。
完成后,您应打开 Shopify 仪表板,将 Evlop 与您的 Android Developer Account 连接。
按照以下步骤:
- 在 Sales Channel 部分点击 Evlop。
- 点击 Account。
- 在 Android developer account 部分的框内点击 Connect。

- 现在,上传 Private Key File 并 Save 更改。
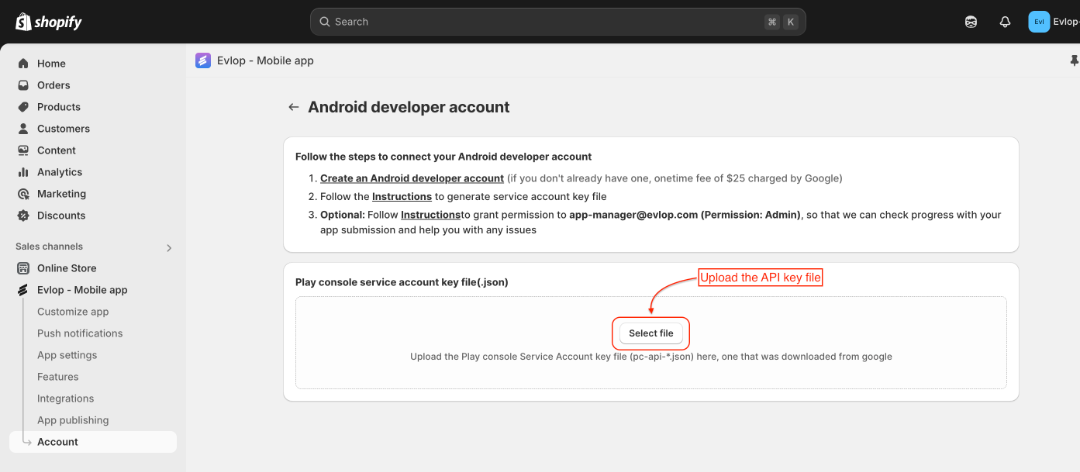
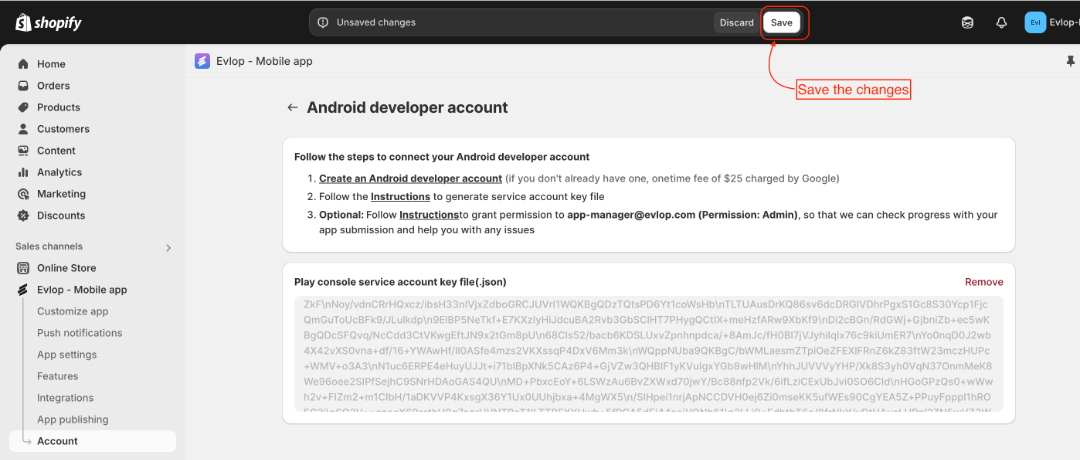

现在,您已成功连接到 Android 开发者账户,并准备继续进行 Android App Publishing process。