Etapa 1: Crie uma Conta de Serviço.
A. Projeto Google Cloud
- Acesse a página do seu Google Cloud Console.
- Concorde com os Termos de Serviço
- Selecione um projeto / crie um novo projeto
É assim que você cria seu Projeto no Google Cloud Console.


Seu projeto será criado assim, vamos prosseguir para criar uma conta de serviço.
B. Conta de Serviço
- Abra a barra lateral.
- Clique em IAM & Admin
- Clique em Contas de Serviço.

- + Criar Conta de Serviço

- Detalhes da Conta de Serviço

- Função da Conta de Serviço

- Conceda à Conta de Serviço a função de Proprietário.

- Conta de Serviço criada com a função de Proprietário.

C. Chave Privada para seu app móvel Evlop.
- Vá ao menu Ação.
- Clique em Gerenciar chaves

- Clique no menu suspenso ‘Adicionar chave’.
- Clique em ‘Criar nova chave’

- Selecione o formato de arquivo ‘JSON’.
- Criar

- A chave privada agora está salva no seu computador.

Etapa 2: Ativar API da Play Store
Concluímos a etapa de criar a conta de serviço e também baixamos a chave privada que precisamos para conectar ao Evlop. Agora vamos prosseguir para ativar a API da Play Store.
- Volte à página de Contas de Serviço.

- Copie o ID de e‑mail da conta de serviço para a próxima etapa.

- Clique no menu Hamburger
- Clique em ‘APIs & Services’
- Clique em ‘Enabled APIs & services’

- Clique em ‘+ENABLE APIS AND SERVICES’

- Role para baixo.
- Localize e clique em ‘Google Play Android Developer API’

- Ative a Google Play Android Developer API


A Google Play Android Developer API foi ativada com sucesso.
Etapa 3: Acesso de administrador ao e-mail da conta de serviço.
- Acesse o seu Google Play Console.
- Vá para a página Usuários e permissões na barra lateral.
- Clique em “Convidar novo usuário”

- Cole o ID de e‑mail da conta de serviço que você copiou antes.
- Clique em ‘Account Permissions’.
- Marque a caixa ‘Admin (all permissions)’.
- Clique em ‘Invite User’

- Confirmar o convite

Etapa 4: Conectar conta de desenvolvedor Android.
Depois disso, abra seu painel do Shopify para conectar Evlop à sua Conta de desenvolvedor Android.
siga os passos:
- Clique em Evlop na seção Sales Channel .
- Clique em Account .
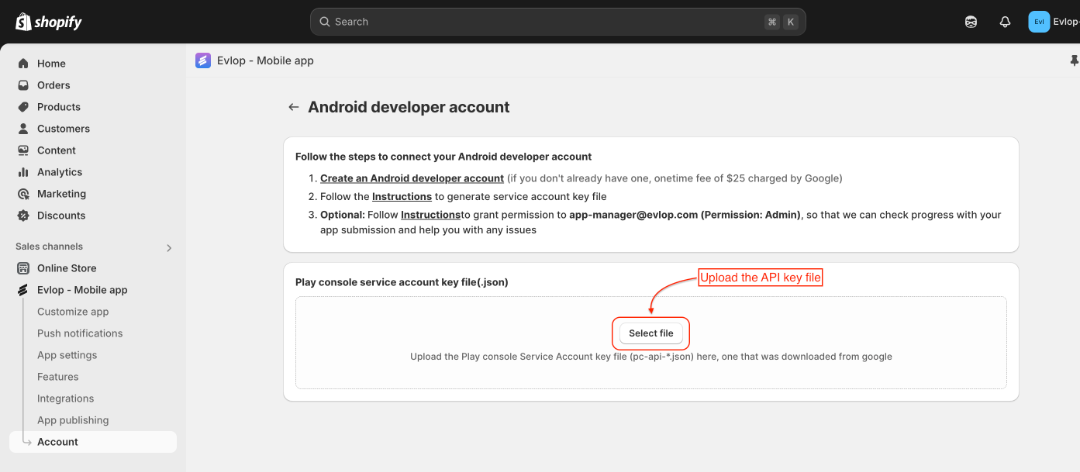
- Clique em Connect na caixa da seção Android developer account.

- Agora, faça upload do Private Key File e Save as alterações.
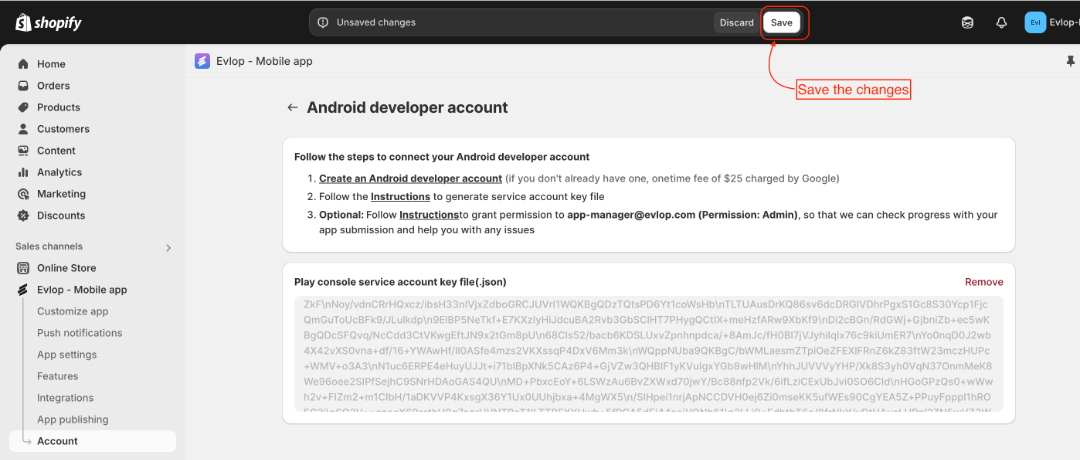

Agora, você está conectado com sucesso à conta de desenvolvedor Android e está pronto para prosseguir com o processo de publicação de aplicativo Android.