Passo 1: Crea un account di servizio.
A. Progetto Google Cloud
- Vai alla pagina della tua Google Cloud Console.
- Accetta i Termini di servizio
- Seleziona un progetto / crea un nuovo progetto
Ecco come puoi creare il tuo progetto sulla Google Cloud Console.


In questo modo il tuo progetto verrà creato. Procediamo a creare un account di servizio.
B. Account di servizio
- Apri la barra laterale.
- Clicca su IAM & Admin
- Clicca su Service Accounts.

- + Crea Account di Servizio

- Dettagli dell'Account di Servizio

- Ruolo dell'Account di Servizio

- Concedi all'Account di Servizio un ruolo di Proprietario.

- Account di Servizio creato con ruolo di Proprietario.

C. Chiave privata per la tua app mobile Evlop.
- Vai al menu Azione.
- Fai clic su Gestisci chiavi

- Fai clic sul menu a discesa ‘Aggiungi chiave’.
- Fai clic su ‘Crea nuova chiave’

- Seleziona il formato file ‘JSON’.
- Crea

- La chiave privata è ora salvata sul tuo computer.

Passo 2: Abilita l'API di Play Store
Abbiamo completato il passaggio per creare l'account di servizio e scaricato la chiave privata necessaria per connetterti a Evlop; ora procediamo ad abilitare l'API di Play Store.
- Torna alla pagina Account di servizio.

- Copia l'ID email dell'account di servizio per il passaggio successivo.

- Clicca sul menu a hamburger
- Clicca su ‘APIs & Services’
- Clicca su ‘Enabled APIs & services’

- Clicca su ‘+ENABLE APIS AND SERVICES’

- Scorri verso il basso.
- Individua e clicca su ‘Google Play Android Developer API’

- Abilita l'API per sviluppatori Android di Google Play


L'API per sviluppatori Android di Google Play è stata abilitata con successo.
Passo 3: Accesso amministratore all'email dell'account di servizio.
- Vai alla tua Google Play Console.
- Vai alla pagina Utenti e permessi dalla barra laterale.
- Fai clic su ‘Invita nuovo utente’

- Incolla l'ID email dell'account di servizio che hai copiato prima.
- Fai clic su ‘Account Permissions’.
- Seleziona la casella ‘Admin (all permissions)’.
- Fai clic su ‘Invite User’

- Conferma l'invito

Passo 4: Connetti l'account sviluppatore Android.
Una volta fatto, apri la tua dashboard Shopify per collegare Evlop al tuo Android Developer Account.
segui i passaggi:
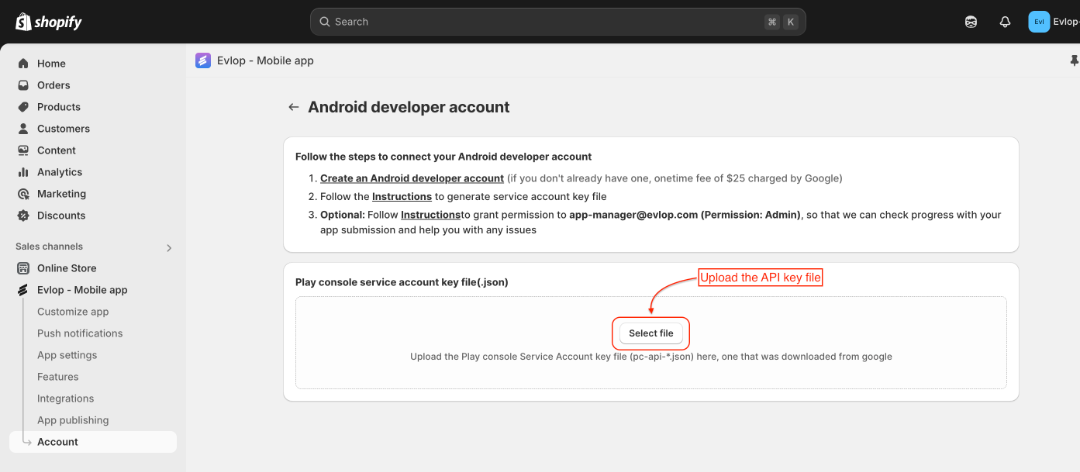
- Fai clic su Evlop nella sezione Sales Channel section.
- Fai clic su Account.
- Fai clic su Connect all'interno della casella della Android developer account section.

- Ora carica il Private Key File e Save le modifiche.
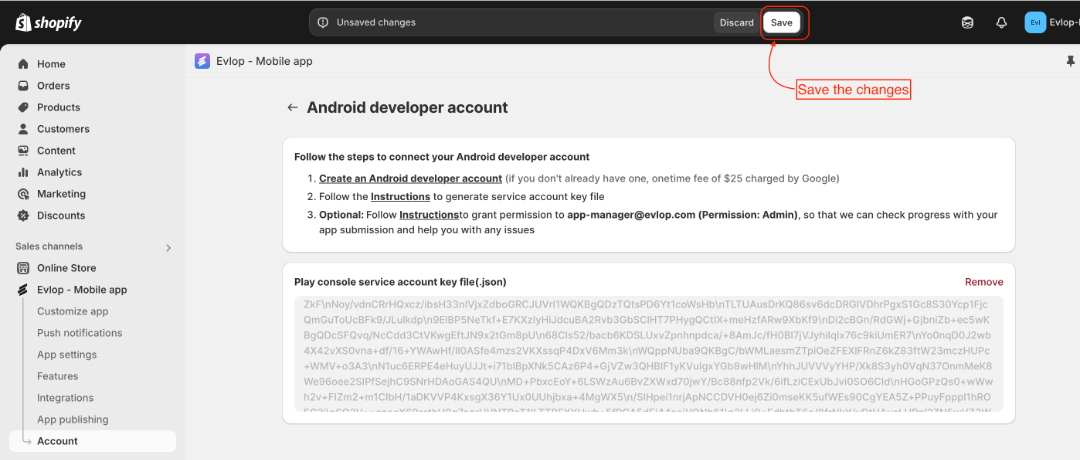

Ora sei collegato con successo all'account sviluppatore Android e sei pronto a procedere con il processo di pubblicazione dell'app Android.