Step 1: Create a Service Account.
A. Google Cloud Project
- Go to your Google Cloud Console page.
- Agree to the Terms of Service
- Select a project/ create a new project
This is how you can create your Project on the Google Cloud Console.


Your project would be created with this, Let’s proceed to create a service account.
B. Service Account
- Open a sidebar.
- Click IAM & Admin
- Click on Service Accounts.

- + Create Service Service Account

- Service Account Details

- Service Account role

- Grant Service Account an Owner role.

- Service Account created with an Owner role.

C. Private Key for your Evlop mobile app.
- Go to the Action menu.
- Click Manage Keys

- Click on the ‘Add key’ dropdown.
- Click ‘Create new key’

- Select ‘JSON’ file format.
- Create

- The private key is now saved to your computer.

Step 2: Enable Play Store API
We have completed the step to create the service account and also downloaded the Private key that we need to connect with Evlop now lets proceed further to Enable play store API.
- Go back to the Service Accounts Page.

- Copy the service account email ID for the next step.

- Click on the Hamburger menu
- Click ‘APIs & Services’
- Click ‘Enabled APIs & services’

- Click ‘+ENABLE APIS AND SERVICES’

- Scroll down.
- Locate and Click ‘Google Play Android Developer API’

- Enable Google Play Android Developer API


Google Play Android Developer API has been enabled successfully.
Step 3: Admin Access to the Service Account Email.
- Go to your Google Play Console.
- Go to the Users and Permissions page from the sidebar.
- Click ‘Invite New User’

- Paste the Service Account Email ID that you’ve copied before.
- Click ‘Account Permissions’.
- Check the ‘Admin (all permissions)’ box.
- Click ‘Invite User’

- Confirm the invitation

Step 4: Connect Android Developer Account.
Once done you should open your Shopify dashboard to connect Evlop with Your Android Developer Account.
follow the steps:
- Click on Evlop under Sales Channel section.
- Click on Account.
- Click on Connect inside the box of the Android developer account section.

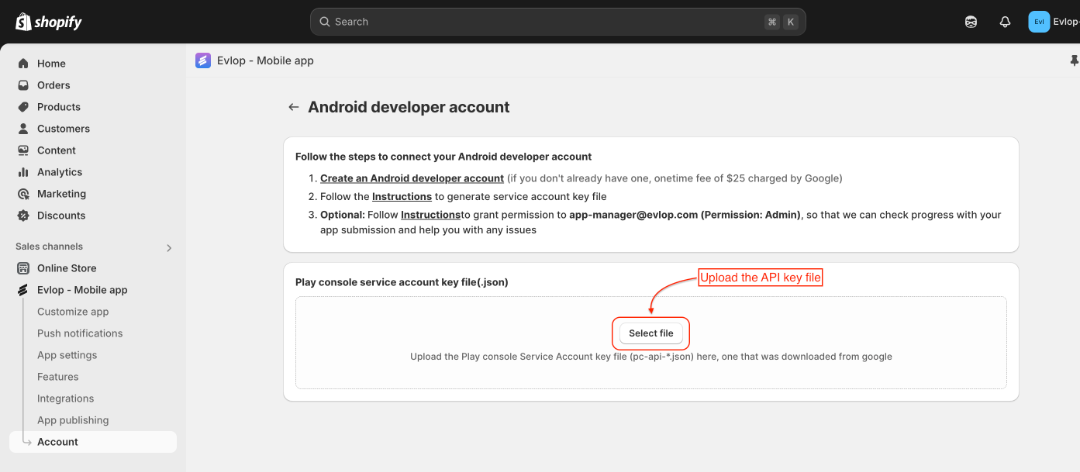
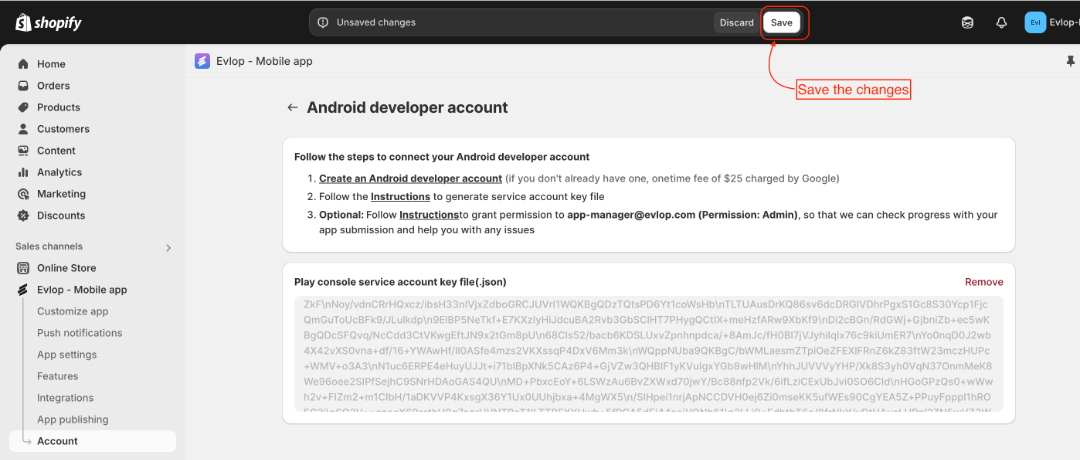
- Now, upload the Private Key File and Save the changes.


Now, you are successfully connected to the Android developer account and are ready to proceed with the Android App Publishing process.
