What is the Product Stickers & Tags Feature?
Product Stickers are digital badges or icons that enhance the shopping experience by adding an interactive layer directly on the product images, providing a quick way to highlight important information. Stickers can convey various messages, such as hot deals, new arrivals, special offers on specific products or categories, or based on conditions you set. They are a powerful tool for capturing attention and increasing engagement.
Feature Highlights 🎯
- Programmable Stickers.
- Sticker Text/Content customization.
- Sticker background color selection.
- Sticker text color selection.
- Sticker Position Selection.
- Easy-Predefined product selection for Stickers.
- Advanced- Automated Product Targeting.
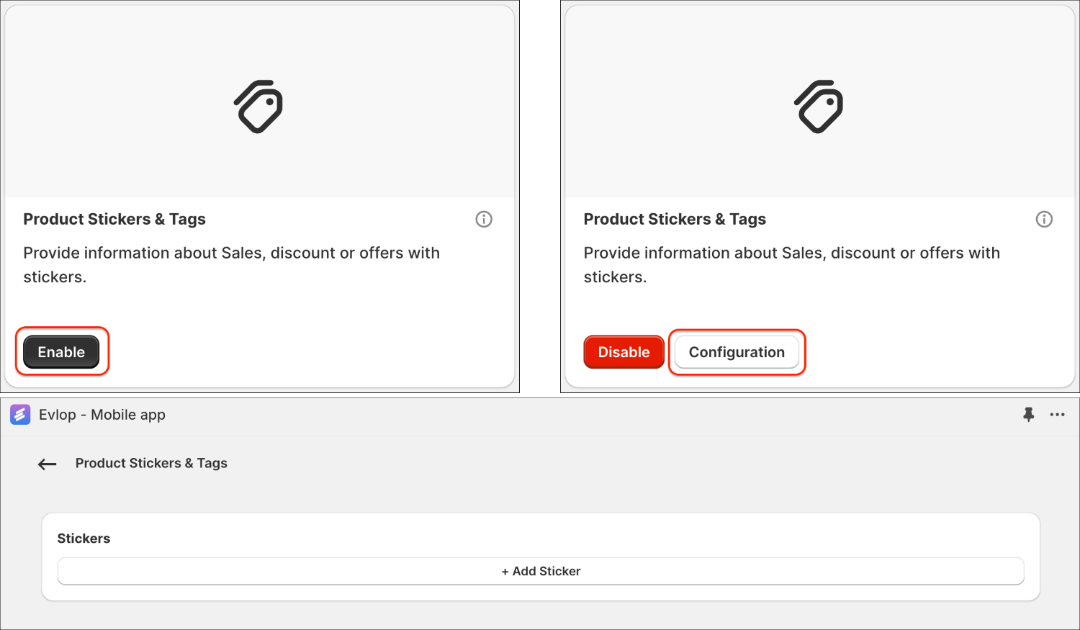
How to Enable 🟢 Product Stickers & Tags Feature?
You can simply click the Enable button along with the Product Stickers & Tags box from the Features page of Evlop Mobile App’s Shopify Dashboard and add Stickers from the configuration.
Highlights 🔎
1. Programmable Stickers
Maximize the impact of your product listings with Programmable Stickers. Go beyond simple text labels and create dynamic, data-driven stickers that automatically showcase your most important product information.
A. Discounts
- Discount Percentage
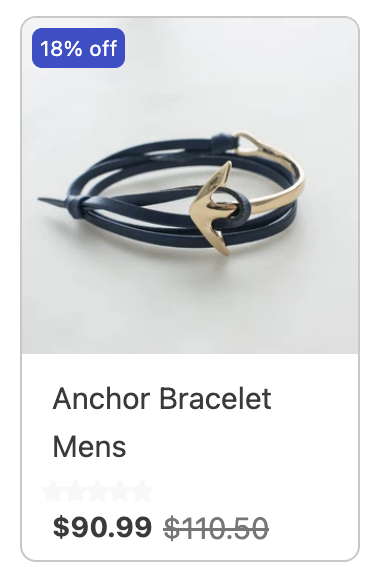
{{discount_percentage}}The {{discount_percentage}} variable dynamically displays the percentage discount currently applied to a product. This value is calculated by comparing the product's current price to its original "compare-at price," clearly showing customers how much they are saving. The percentage symbol "%" is set by default for the {{discount_percentage}} sticker, and we have also added the word "off" for clearer communication on the sticker as: {{discount_percentage}} off
Product selection
◉ Based on conditionsDiscount percentage Is Greater than O
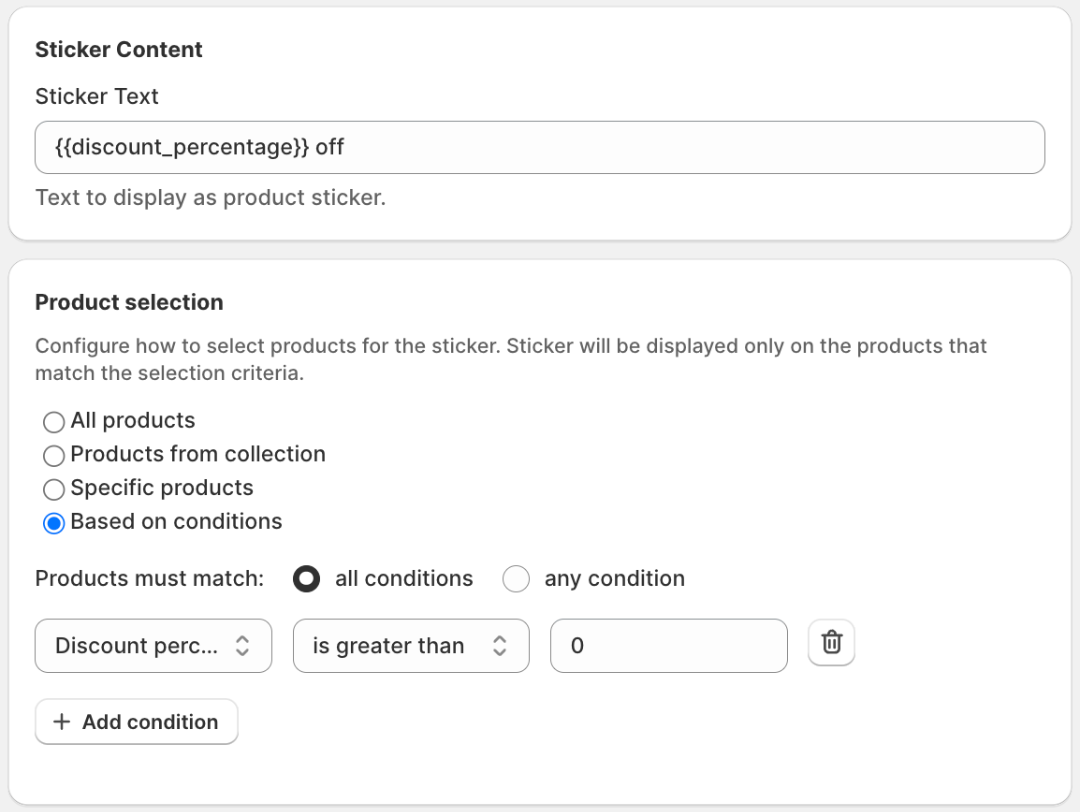
This condition ensures that the product does not show a discount percentage if there is no discount, effectively minimizing the chances of displaying "0% off" on any product.
- Discount Amount
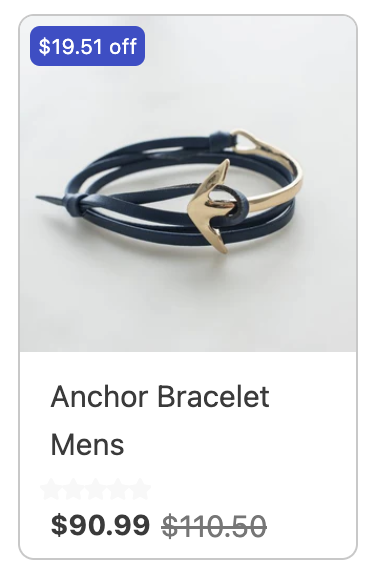
{{discount_amount}}The {{discount_amount}} variable shows the exact discount value a customer receives. It is calculated by subtracting the current price of the product from its original "compare-at price", clearly indicating the amount saved. The store's default currency symbol for example a dollar symbol "$" in this case is set by default for the {{discount_amount}} sticker, and we have also added the word "off" for clearer communication on the sticker as: {{discount_amount}} off
Product selection
◉ Based on conditionsDiscount price Is Greater than O
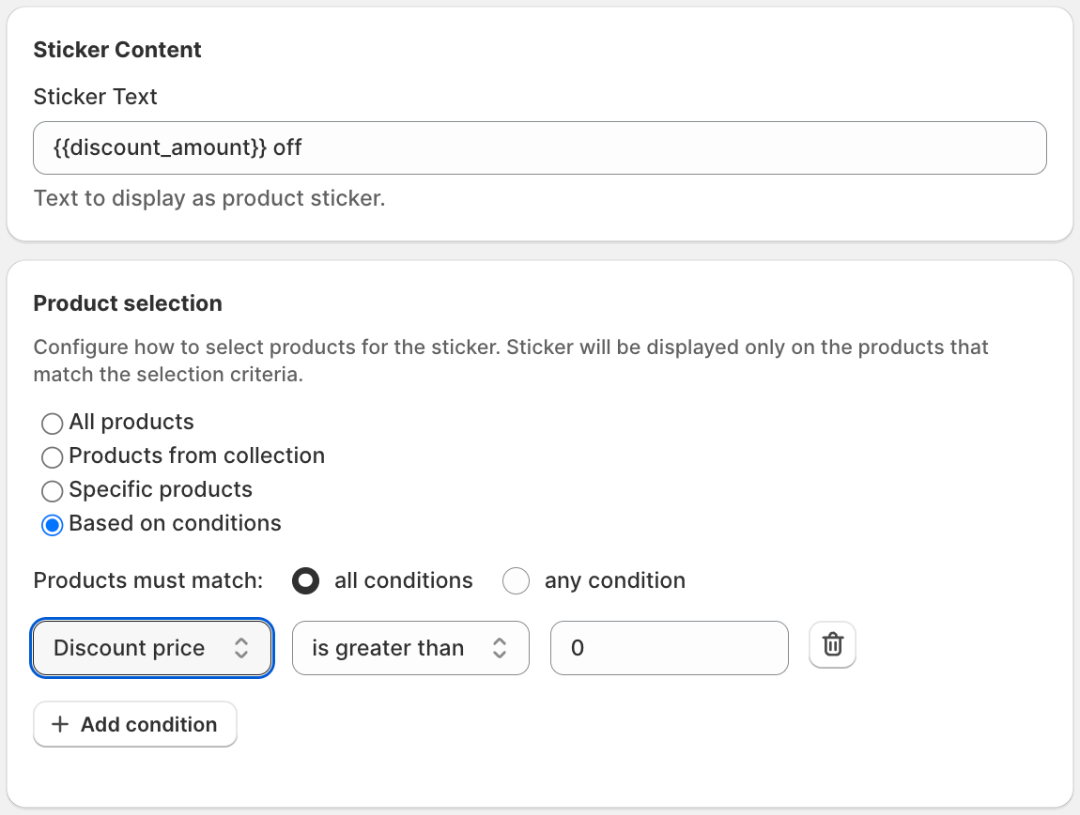
This condition ensures that the product does not show a discount amount if there is no discount, effectively eliminating the chances of displaying "$0 off" on any product.
Additional customizations with discounts:
{{discount_amount(precision:1,prefix:"-",suffix:"%")}}
prefix: Text to display before the percentage or amount value (e.g., "-" 👉 -20%, )precision: Number of decimal places (e.g., 0 for whole numbers, 2,3 for cents and their decimal values).suffix: Texts or signs to display after the percentage or amount value (e.g., "%").
⚠️ Note: Using double quotes "" with no input between them, following the prefix
prefix:""and the suffixsuffix:"",will remove default signs and symbols, such as % and $. Any input placed between the double quotes will replace the default signs and symbols with the new input.
B. Available Quantity Display
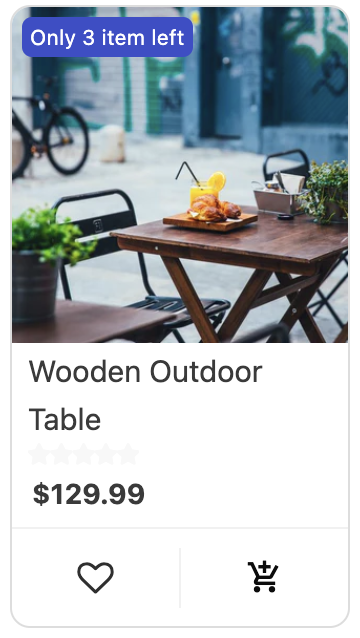
{{available_quantity}} The {{available_quantity}}variable shows the current stock level for a product, indicating to customers how many units are available for purchase. This value automatically updates with each sale, providing real-time inventory information and creating a sense of urgency for items with limited stock.
Product selection
◉ Based on conditionsAvailable quantity Is less than 10
Available quantity Is Greater than O

This condition ensures that the product's available quantity is not displayed until the quantity drops to 10 units and remains hidden when it reaches to 0. At the first place, it may not be ideal to always show the available quantity of a product, so we set a threshold of 10 (which you can set to your preference). Additionally, there is no need to display '0' unit of availability for out-of-stock products.
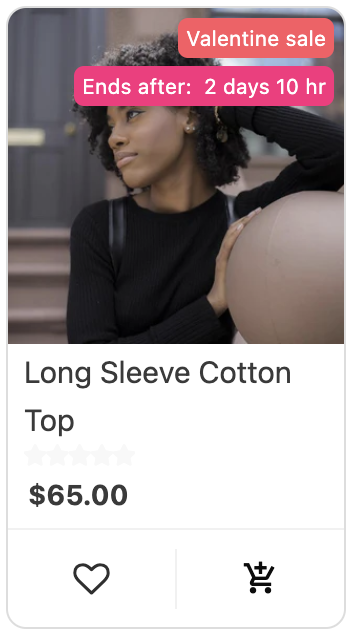
C. Countdown Timer
{{timer}}The {{timer}} variable displays a countdown timer, perfect for highlighting limited-time offers and creating a sense of urgency. Using our Sticker Schedule feature, you can easily set both the start and end dates for your timer with the scheduling feature available with the stickers, automating your promotions and ensuring they run precisely when you want them to.
Scheduling
Starts At Ends at
dd/mm/yyyy, --:-- -- dd/mm/yyyy, --:-- --
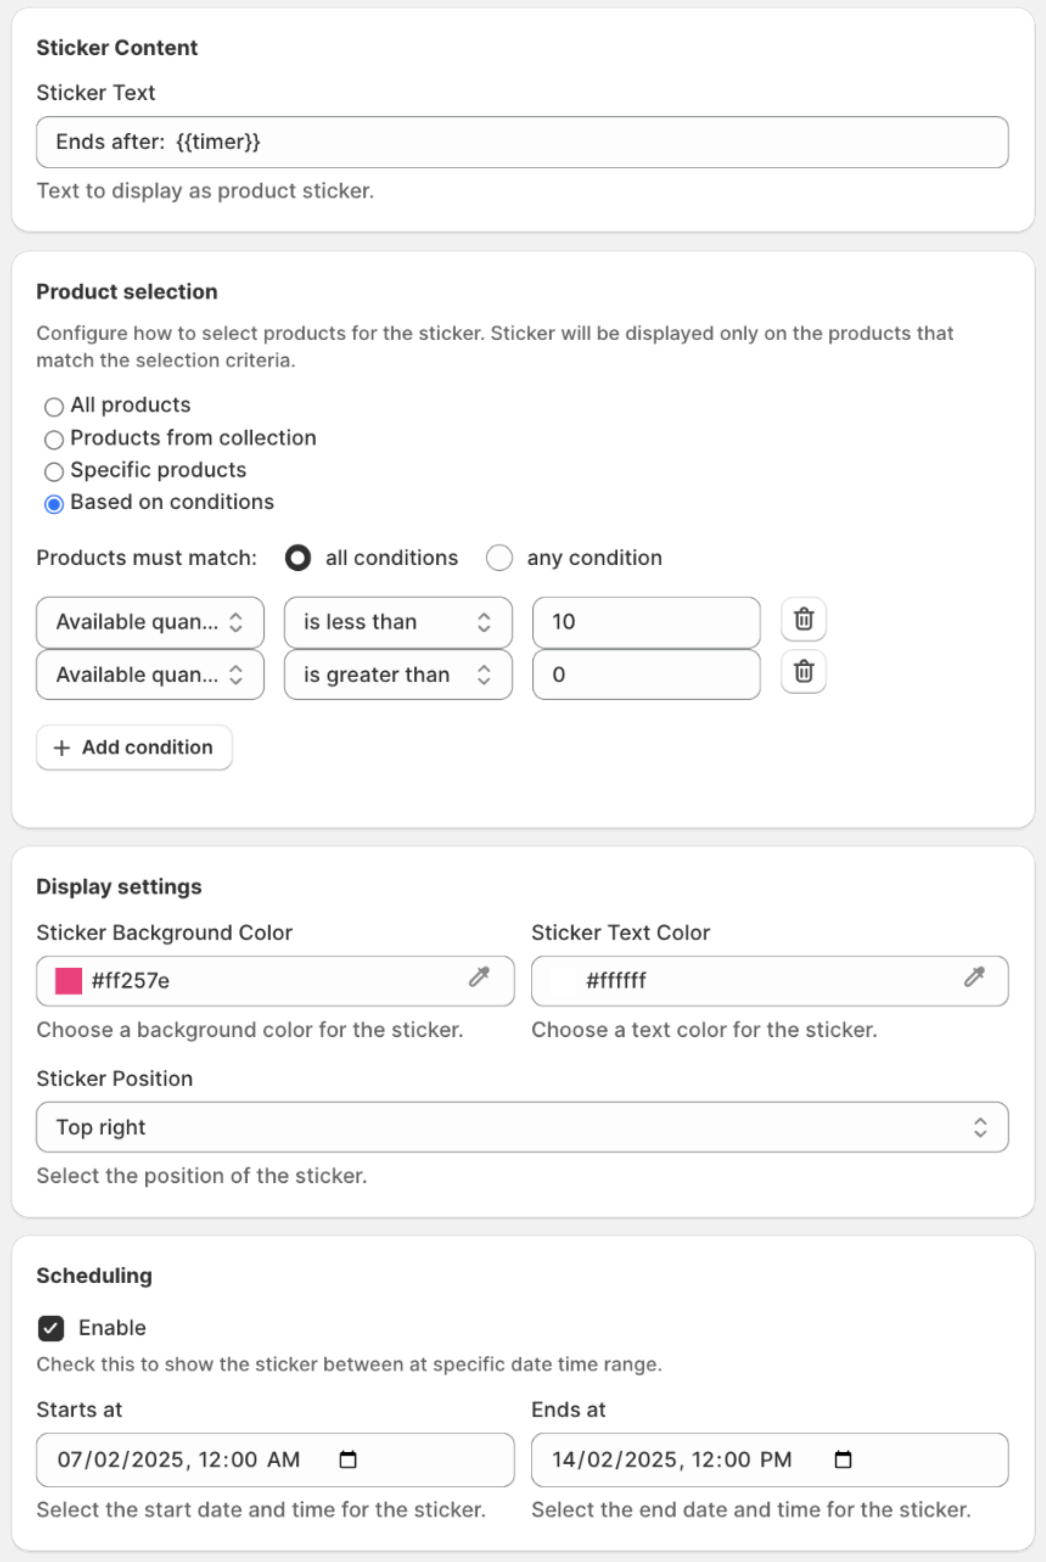
The scheduling function of a sticker is integrated with a{{timer}}, effectively displaying and hiding the countdown. This advanced function creates a seamless experience that enhances the viewer's sense of urgency, ultimately making the offer more effective.
Additional customizations with Countdown Timer:
{{timer(maxParts:3,hideZero:true)}}
maxParts: It limits the timer to a maximum number of time units to display (e.g., 3 for days, hours, minutes; 2 for hours, minutes).hideZero: Whether to hide any time unit that has a value of zero (true or false). WhenhideZeroistrue, any time unit that has a value of zero will be hidden from the timer display. (e.g., 3 days, 0 hours, 20 minutes remaining: WithhideZero:true, the timer will display "3 days, 20 minutes". The "0 hours" part is hidden becausehideZerois true.)
2. Sticker Text/Content customization.
Clearly communicate the message you want to convey with your sticker. This could be a promotional term (e.g. “Sale!”), a product attribute (e.g. “New Arrival”), or a custom label (e.g. “Staff Pick”). Including emojis may make the sticker and its communication more attractive and effective (e.g. ” 🛵 Free Delivery”, “✨ Staff Pick”, “🆕 New Arrival”).
3. Sticker background color selection.
You can select a background color that complements your app’s overall design aesthetic or effectively communicates the message you want to convey to your customers. Also, make sure that the text remains legible. Using a contrasting color can help make the sticker stand out.
4. Sticker text color selection.
Select a text color that provides clear visibility against the chosen background color. Opt for high-contrast combinations for optimal readability.
5. Sticker Position Selection.
Strategically place your sticker to draw attention to the desired product element. You can choose from:
- Top Left: Ideal for highlighting new arrivals or discounted items.
- Top Right: Effective for showcasing bestsellers or limited edition products.
- Bottom Left: This can be used to emphasize product features or unique benefits.
- Bottom Right: Suitable for drawing attention to the sense of urgency kind of elements (e.g., few items left)
6. Easy-Predefined product selection for Stickers.
Define which products will receive your custom sticker:
- All Products: Apply the sticker to your entire product range.
- Pick from Collections: Select specific product collections to receive the sticker.
- Select Products Manually: Choose individual products to implement the sticker.
7. Advanced- Automated Product Targeting.
For a more dynamic and automated approach, you can automate the product selection based on various conditions. You can define:
Product Matching Criteria: Choose whether products must meet All conditions (AND) or Any condition (OR) to receive the sticker.

Conditions: Specify the criteria that will trigger sticker placement. Options might include:- Title: Products with titles containing specific keywords (e.g., “Summer”) can be targeted.
- Price: Apply stickers to products within a certain price range.
- Tag: Products associated with specific tags (e.g., “Organic”) can be highlighted.
Type: Distinguish between different product types (e.g., “Clothing,” “Accessories”) for targeted labelling.
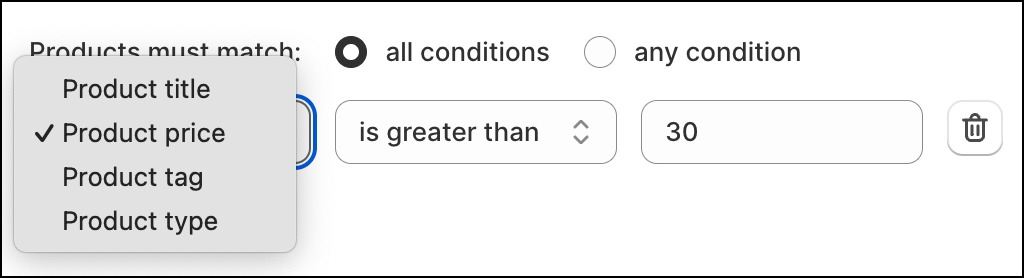
Multiple Conditions: Combine various conditions to create precise targeting. For example, you could sticker products that are both “New Arrivals” (Title) and under a certain “Price.”

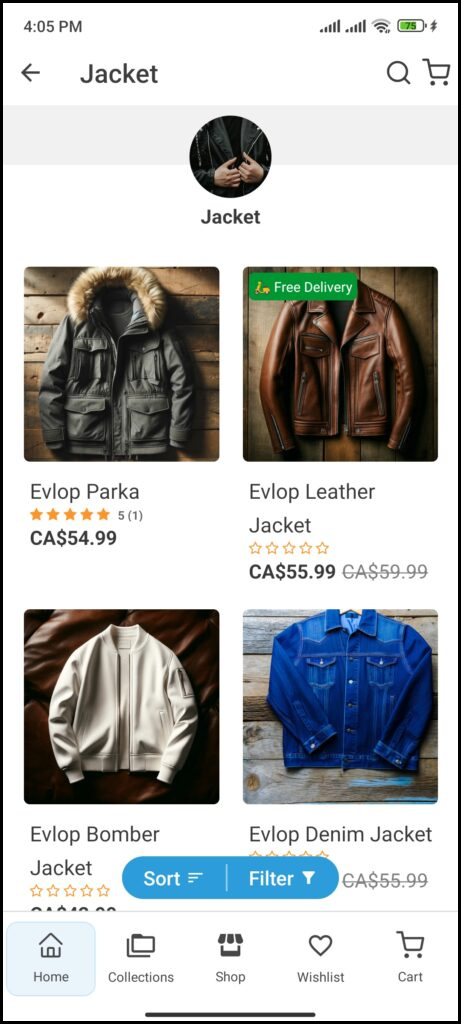
How customers will see it.